|
|
EPISODE #113 -
SATURDAY JUNE 2, 2012
The first days
of June have arrived. It seems like this spring has gone by
pretty fast. We still seem to have a lot of projects around the
house to do and summer is almost here! I’m still impressed with
all the nice weekends we have been having. I think I have spent
more time in my hammock than I did all of last year… maybe that
is why the projects are not getting done?
We would like
to announce our next giveaway. Last week we did a story with
Ragan Corliss from
Decorating Den Interiors about using stencils from
Cutting Edge Stencils to change the look of a room. Well,
Cutting Edge was gracious enough to give us a stencil kit to
give away. All you have to do is go to our Facebook page and
‘Like’ us to be entered for your chance to win!
Collectable Glass
A lot of
people have old pieces of glass in their homes. It could be a
plate or a vase that has been handed down from family member to
family member. Sometimes we are not sure of the history or the
value of this unique art form. To get a lesson on collectable
glass we stopped by and chatted with Gary Germer from
Gary Germer and
Associates (503-235-0946). He told us that glass has been
produced for thousands of years, but he would do his best to
give us a 5 minute primer on glass. We started with pressed
glass. This glass is from the beginning of the industrial
revolution. The process allowed glass to be mass produced and
brought the cost down for everyone. This meant everyone could
own nice glass pieces. Next we moved to the ‘American
Brilliant’ period cut glass. This was the finest cut glass ever
made and the quality was outstanding. This glass had patterns
cut into it and what makes it so much better than cut glass from
today is that they hand polished the glass to really make it
shine. In the early 20th century there was a lot of
experimentation with colored glass and patterns. They would
even make a glass in one color and then heat it to create
different colors beyond that. Tiffany and Steuben started to
work on iridescent glass, which became the finest in American
art glass. They took their inspiration from old Roman glass and
made it unique to the 19th and 20th
century. This is what the wealthy families collected at that
time. For the rest of the populace who couldn’t afford the
iridescent glass, the manufacturers came up with a cheaper
version called ‘Carnival Glass’. It is very collectable now
and the market is pretty depressed so you can get some good
affordable pieces. We also looked at some of the different
pieces from Europe as well that included carved glass and even
one that looked like an aquarium. If you are interested in
picking up a piece of collectable glass or you have a piece that
you think may be worth something, stop by and see Gary and his
staff.
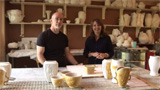
LoneSomeVille Pottery Process
Pottery is a
lost art. Sure you can find pots at your local store, but the
high quality, high fired, pottery is now mass produced and that
it why it is great to know that one of the best pottery houses
on the west coast is right here in Portland. We dropped by
LoneSomeVille
Pottery (503-774-5387) and met with Wayne Hughes, one of the
owners and learned how they make this incredibly decorative
pottery. It all starts with an original design by Northwest
artist Danny Hills, then Todd or Jose makes a mold of that
design. Then they glaze it and fire it, producing a limited
amount of pieces and then sell it around the country. The
influence for the piece can be found in pottery houses from the
1930’s. The other big difference is the high fired technique
they use. Low fired pottery is not as hard and will chip and
break easily. The high fired process also means that it is
dishwasher and oven safe. They also work really hard to made
pottery with multiple glazes. This means that there is a big
variation of colors even within the same piece. We then moved
inside the house to see their showroom and were blown away by
all the different styles of pottery they made from plates and
cups to tiles and vases. There was quite a selection. Your
chance to pick up some of this pottery is this weekend at their
Spring Open Gardens and Studio Sale. It happens June 2nd from
10am to 4pm. If you happen to miss the sale you can head to one
of the great local retailers they supply. You can find a
complete list of locations on their website.
Port Cocktails #1
The old
image of port is one of old gentlemen sitting around smoking
cigars and sipping port. That image is really changing. Port
is now part of the cocktail scene. To learn more about port and
how to use it we paid a visit to the
Rum Club to
talk to Lorenzo Bakewell-Stone who is from Portugal. First we
talked to Mary from
Park
Kitchen (503-223-PARK) she is also from the group LUPEC,
which stands for the ‘Ladies United for the Preservation of
Endangered Cocktails’. The group promotes women in the industry
and they have fun doing it. She made 2 drinks. The first was a
Pink Drink using Croft Pink Port and New Deal vodka and
sparkling wine. While she got started we asked Lorenzo about
port. Port is a fortified wine. That is a wine that has a
grape spirit added to give it more flavor and more alcohol. The
port we were using was the first Rose port; it is lighter and
easier to drink than some of the older style ports. It is also
lighter in cocktails! That means the second cocktail was a
coffee cocktail which was made with Portland coffee! It was
delicious! If you are looking to have something new and
refreshing this summer, try a port cocktail! You can find a
downloadable book of recipes at
www.PortCocktails.com.
Pollo con Pedro Ximenez
Chef David
is at his happiest when he is in the kitchen and he is REALLY
happy when he gets a new cookbook! We recently received the
cookbook ‘Espana,
Exploring the Flavors of Spain’ by James Caruso and David found
a great recipe in it that he just had to make. The recipe is
called Pollo con Pedro Ximenez. Pollo is chicken and Pedro
Ximenez is a Spanish Sherry. As a chef he was also excited
about using the
EaziStore Cookware from Natural Home which we were given to
try out in the kitchen. David loves the way it cooked evenly
and how well it stacked in the cupboards to save him lots of
room. For the recipe he started with 15 large cloves of garlic
and about a ¼ cup of chopped onions and sautéed them in some
olive oil for about 10 minutes on medium heat. He then added 6
medium sized boneless chicken thighs and browned them on both
sides for about 4 minutes per side. Then he removed the chicken
and added some liquid ingredients including chicken stock,
orange juice, vinegar, and then the Pedro Ximenez sherry. You
cook that on medium heat for 3-4 minutes and add the chicken
back in. While the chicken was cooking David prepared the final
ingredient, orange segments. When you do a recipe like this you
want the orange segments to not have any of the white pith so he
showed us how to remove that from the orange. David removed
the chicken for the final time and added the orange segments to
the liquid mixture and just let it cook for a couple more
minutes. Then it was time to dish it up. You place the chicken
on a plate and spoon the orange/Pedro Ximenez mixture over the
top and serve. It was incredible!
Ludeman’s Cushions
If you are
looking to change the look of your deck or patio furniture it is
easy to do with a quick and simple change. Just replace your
cushions on the furniture. It is easy and inexpensive. You can
find replacement cushions at many local furniture and variety
stores. We found a huge selection at the
Ludeman’s (503-646-6409) in Beaverton. When you go looking
for new cushions look for ones that are water resistant and UV
protected. Get a couple of different patterns and then you can
have 2 or 3 different looks all summer long.
Quick Tip – Changing Out Cabinet Hardware
One of the
quickest ways to change the look of your cabinets is to change
your cabinet hardware. We stopped by
Parr Lumber
(866-214-7277) and asked Amber how to do that. Her big
recommendation was to measure your old handles first. Make sure
you know how much space is between the screws of your old handle
before you buy some new ones. For her example, the space
between screws on her old hardware was 3 inches. Now she knows
her new hardware screws have to be 3 inches apart for it to fit
so she doesn’t have to drill new holes. The second tip was to
make sure that you know the thickness of your cabinet doors.
You don’t want to get screws for your new hardware that are too
short or too long. If you have any questions, as always, you
can check with the experts at your local Parr Lumber store. |
   
 |
||||||||||||||
|
Website design and content ©2009-2012 Gustin Creative Group.
Please send website inquiries to
gustingroup@comcast.net. |